Any leaks around the side windows and roof vents means you have to remove them, clean up the old butyl tape sealant, apply new butyl tape and reinstall, not a hard job but also not something you can do in an hour. If there is caulking around the windows or vent, especially if it is silicon you have extra work to clean that off. A leak can never be repaired with caulking, the window or vent must be removed and resealed properly.
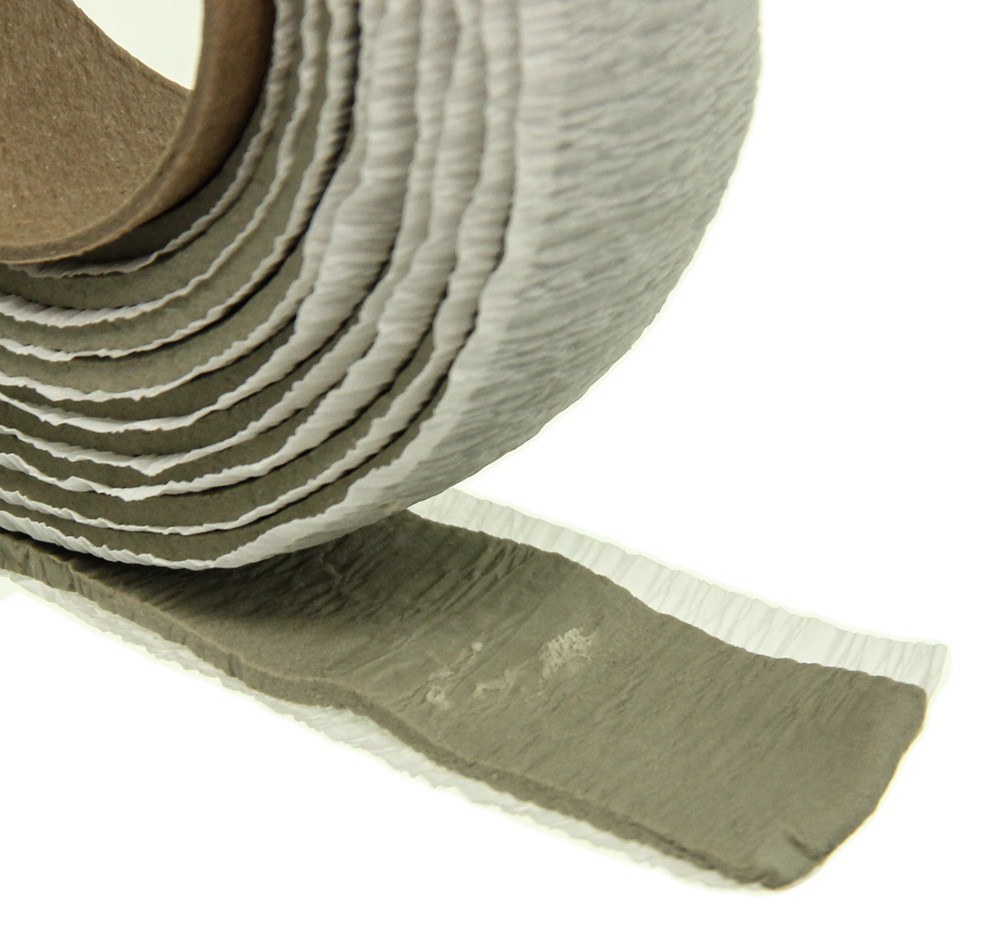
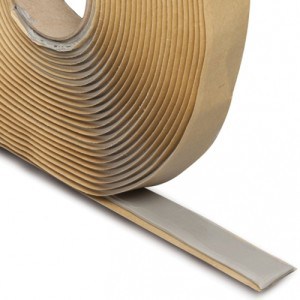
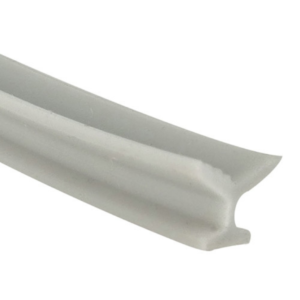
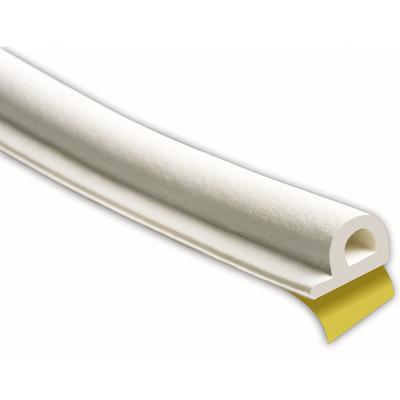
Butyl tape is a remarkable product, this sticky, flexible tape can seal windows and vents for many decades but be aware there are two different products that are often called butyl tape, these pictures show the difference. The left picture is actually butyl putty which is of a lesser quality and only lasts about 8-12 years.
The product on the right is butyl tape, a very high quality product which will last over 40 years.The easiest way to tell the difference between the two is by looking at the release paper. The release paper on the putty is like crape paper or wrinkly, the release paper on the butyl tape is smooth and a heavier coated paper.
The side windows are mounted either with screws into an interior wooden frame or with rivets through the fiberglass with steel backing washers. To remove the Jalousie either remove the screws or carefully drilling out the rivets using a 1/8″ drill bit, this prevents accidentally making the hole larger if you drill through the fiberglass. Usually just drill until the rivet head comes off, then the rest of the rivet can be tapped out with a small punch or even pulled out from the inside with a pair pf pliers. Once all the fasteners are removed the window can be carefully pried and worked out. This can be a lengthy and messy job as the butyle tape will be resisting your every attempt.
Once the window or vent is removed all the old butyl tape must be removed and cleaned up. While you have the side windows out it is a good idea to inspect the seals around the opening window panes and the opening mechanism. The Jalousie windows are excellent in both quality and function and can be completely rebuilt as shown in the attached video.
The side Jalousie windows use 3-4 different seals, these seals fit into grooves on the window frames that are easy to access if you have the windows out and apart.
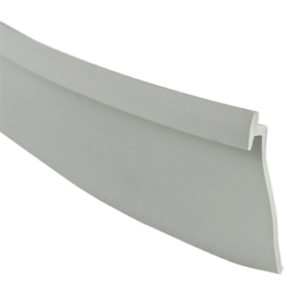
Along the top this gray vinyl seal is used on the header (Top) of Boler side jalousie windows. It is 7/8″ tall. The T at the top is approximately 1/8″ wide and slides into an 1/8″ channel on the top edge of each window frame
Header Seal
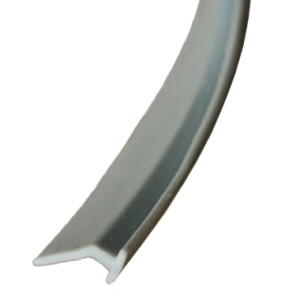
Along both sides a silicon rubber “J” seal slides into an 1/8″ channel on the side edge of each window frame
J Seal
The bottom pane of glass closes against this seal. The seal fits in a channel and is held in place without adhesives, but the channel is often crimped, the crimp can be opened up by carefully inserting a small screwdriver into the slot and twisting gently.
Y Seal
Between the 2 two window panes I used a “P” weather-strip available at most home improvement stores
http://www.homedepot.ca/
This article is not quite finished yet.
http://www.stanleyengineeredfastening.com/news/new-pop-high-retention-rivets-superior-clamp-and-stability
Jim Pissot
EXCELLENT SITE!
most helpful as I tinker with my 1977 13 ft Boler
Cheers,
jim
Canmore, AB
Ian
Thank you Jim, appreciate your comments. The site still needs a lot of work, I have many, many articles under development but being as it is camping season writing becomes a lower priority. Any questions please feel free to ask.
Jim Patterson
Hi Ian, Great site. I can appreciate the effort you are putting in.
Is there a source for the gray gasket surrounding the glass in the window of the door on a 1973 boler? Mine has shrunk or is missing a 2 ” section.
BR Jim Patterson in Pointe-Claire Qc
Ian
Hi Jim
I would remove that seal. My recommendation is to remove the seal and glass, clean everything up, place a bead of butyl tape around the inside of the window frame then bed the glass into the butyl tape. This gives a very clean look and will not leak.
Jim Patterson
Thanks for the tip.
Jim
Walter
Ian do you know where to find the crank mechanism for the door window?
Ian
The spline used on the window operators is the same as the spline for standard roof vents, for the dinette side windows I prefer to use the plastic knobs for the vents, these are flatter and don’t “stab you in the back” when sitting. For the door and kitchen stove window it is much nicer to have the aluminium crank handles, these are available through Vintage Trailer Supply http://www.vintagetrailersupply.com/Swivel-Handle-p/vts-324.htm
Danelle, Canmore
Awesome video, Ian. And given that we discovered both side windows leak when camping last weekend it’s needed. Although, I don’t dare pull apart until your re-assembly video is posted! Thanks for all your great resources!
Ian
Thank you Danelle.
The video on rebuilding the windows is on my to-do list but that list is quite long so I cannot say exactly how soon I will have that video completed.
Lance Hall
Thanks for the great video Ian. Lots of helpful info as I redo my 1975. I have ordered all the rubber bits to rebuild both windows.
Lance
Marty
Thanks for the link to Vintage Trailer Supply. Ordered the top seal, J seal, and bottom seal. Shipped gaskets are great. Two questions:
Which way does the bottom seal go? (Original was missing) With the point of the ‘V’ up or down?
How to seal the sides of the panes? There isn’t a groove for a gasket. -On the window or the frame.
Ian
Hi Marty
For the lower seal you are making me think back in time … I believe the narrow part of the V goes up.
For the side J seal there should be a groove that the seal will slide into, look at my video at 5:35 and you will see the seal and sliding it out, if the seal is missing there should be a very narrow groove. https://www.boler-camping.com/boler-care-maintenance/fixing-leaks-windows-vent/
Marty
Thanks. That looks right. The video is great, but my window looks a little different from yours. Doesn’t look like there’s a groove for J seal. I’ve posted a photo and question on Fiberglass RV forum.
Andrea
Hey Ian! I just stumbled upon this treasure trove website of yours – my husband and I were so disappointed when we looked up how to repair the original windows in our Boler (many sites suggested removing and replacing them with new sliding windows). The previous owners of our little 1975 damaged a lot of the components of some of the windows when trying to fix them. I really appreciate the step by step tear down – I am beyond excited that we can keep the original windows and bring them back to their original state!
Really appreciate the effort you’ve put in to all of these tutorials – I’ll be lurking around here soaking up as much knowledge as I can. Thank you – you’ve inspired me to get back at it with fixing up our beloved Boler.
Ian
Thank you Andrea
If you run into any troubles please contact me
Lana
Amazing site, love that you link directly to where to buy things! I would love to see pics of those items installed and maybe lengths to purchase. You clearly have a passion for Boler’s and are really very talented!
Ian
Thank you Lana
Yes I do have a passion for Boler’s and a desire to help the owners.
Doug
Ian – love the site. Just purchased a 1977 13′ Boler in sad shape. Fortunately the bones are good. One window has broken aluminum parts so the window will not open or close. I will be attempting to make them using a template from the side that fortunately works.
Ian
Thank you Doug
Many of the parts are available for the Jalousie windows, Check the Strybuc catalogue her, if they have the part then just do a Google search and there is a good chance you will find it online.
http://www.strybuc.com/public/Catalogs/Strybuc/Strybuc-Window-and-Door-Hardware-Catalog-2016/#?page=257
Randy
Thank you for this site. Any ideas on where I might find a rear jalousie window for a 75 13′?
Ian
Hi Randy Most Boler’s came with fixed acrylic front and rear windows. Some were available with rear sliding windows (in these the front was still fixed acrylic).
Are you referring to the very back rear window or the side dinette window?
If your rear window is a jalousie I would love a picture as I have never seen a jalousie installed in the back
Ian Barrett
Hello Ian,
A fellow Ian, that has enjoyed and utilized your knowledge greatly. Thanks for all the great work.
We have a 1980 13′ Boler with the rounded Jalousie Side windows (have pictures, will post on Facebook/Boler.ca when accepted) I’ve used your resources (Vintage Trailer) and The Boler Travel Trailers (TBTT) group, but it appears most seals and suggestions are for the square side windows. Do you have any additional suggestions to source the complex top header seal? I have a picture of just the seal that I just posted in the TBTT group.
Many many Thanks,
Ian Barrett
Ian
Hi Ian, (great name), yes the seals I show will fit most of the older style jalousie windows. The following suppliers have a good selection and may be able to help you
Pelland Enterprises http://www.pellandent.com/RV_Products_List.aspx?CategoryID=303
Vintage Trailer Shop http://www.vintagetrailershop.com/6-windows-and-gaskets
Vintage Trailer Supply (who you said you tried with no luck)
Hehr Windows (this is just one page, next page link at bottom of page) http://www.parkin-acc.com/page53.html